This year's theme was SHINE (there was lots of gold and silver with accents of burlap
and greenery and......pallets). If you
are responsible for decorating your school cafeteria on a tight budget
here are some LOW cost items.
This was the stage. We covered it in burlap and used 3 trees that we either had from previous years we that were donated to the school to flank the stage on both sides. Every year around this time I send e-mails to my neighborhood, to my friends and I run an "article" in the school weekly newsletter that we want your old holiday decor - and then I go pic the stuff up! It's also a great idea to run this same article AFTER the holidays. People will give you their stuff for FREE! The trees were decorated with white lights and big gold and silver glitter star ornaments we bought from the Dollar Tree. They really "shined" and were easy to see from across the room. We asked the chorus teacher to keep the black background up from her chorus performance (FREE background-check). Then we used old tree and shrub outdoor lights (that were donated from our grandmother's attic) we zip tied together and hung from the ceiling with white tulle fabric hung over the lights. The rope light you see just strewn up on the stage was also from our grandma's attic:).

There were 2 silver tinsel trees we bought as a set from Target (on sale with a Cartwheel coupon - if you do not have Cartwheel go download it right now, I mean it, now, right now).
This large tree was drawn with chalk by an amazing student artist on a big sheet of "Quiet Board" we bought from Home Depot for around $10. You can find quiet board in the same section as mdf sheets in the hardware store - and it's already black! We then put some pine garland we bought on sale from Hobby Lobby around the top. This was inspired by a Pinterest picture - we loved the way it turned out. We then added some boxes we wrapped in gold and silver wrapping paper (we wrap these same boxes every year - seriously I think there is 4 or 5 layers of wrapping paper). And Ace Hardware donated these burlap sacks so we filled them up with boxes.
 |
| This star on stage is hard to see in this picture...but it was made by nailing tree branches from my yard together (see below) and then wrapping white lights around the branches. |
 |
| This was the star drying out in my house after it was nailed together. |
|
|
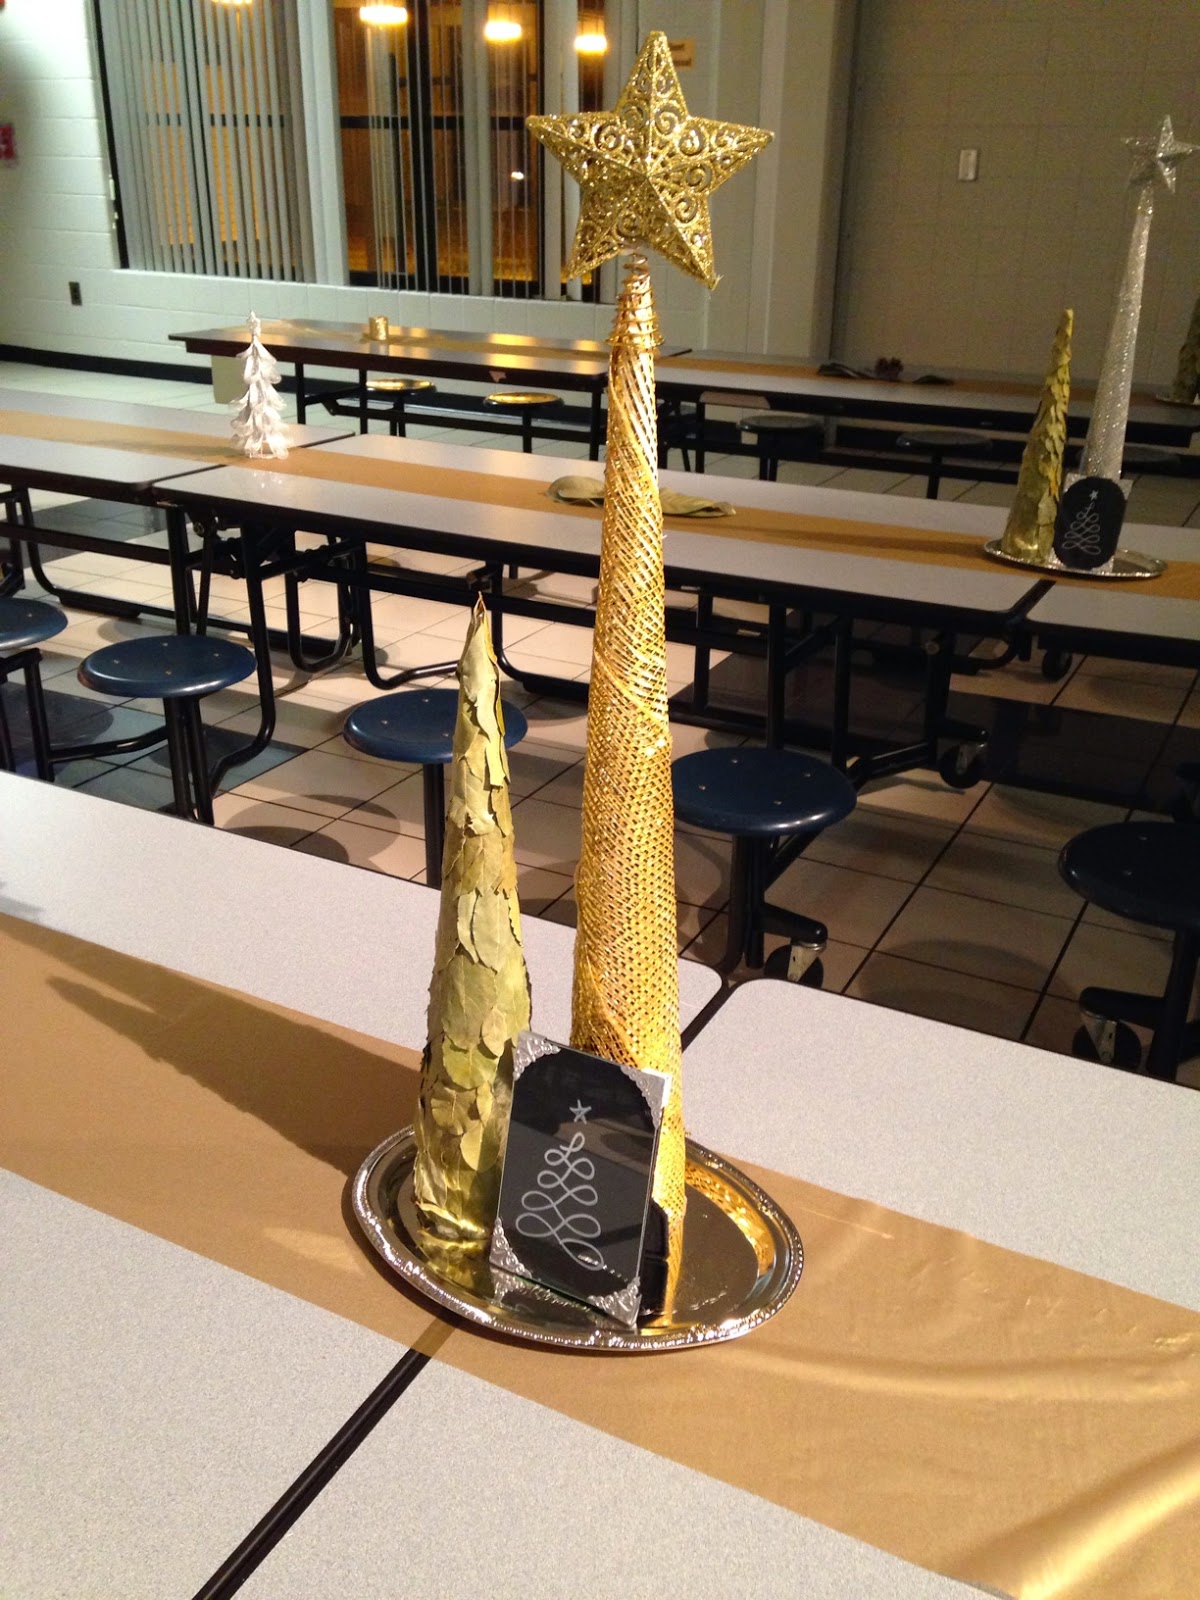
The long lunchroom tables were covered with a gold table runner (made by taking a single gold plastic table cloth roll we purchased (from Garden Ridge) and cut into strips as table runners). The center pieces were these little sets of a bay leaf tree, a cone tree and a framed tree all glued on a silver tray (purchased from Dollar Tree). Directions for the bay leaf trees and silver/gold cone trees are below. The framed tree was black poster board we cut to fit a Dollar Tree frame and we just drew this tree with a white chalkboard marker on the poster board.
On either side of the table we had these magnolia arrangements. We spray painted Magnolia leaves we picked up from our neighbors yard (again FREE) and then we hot glued them together with glitter pine cones we bought from Walmart.
We bought these gold and silver trees from Garden Ridge. We placed one on each end of the table.
 |
| Just another picture of the stage and tables. |
These were the round tables we covered with gold and silver plastic table clothes. Then the center pieces were logs the most amazing friends of mine (Josh & Anna Childress) donated and cut for me:) On top of the sliced logs were "pine cone" glass hurricanes from Target (again on sale and we used a Cartwheel coupon), filled with flameless votives and surrounded by pine cone trees. We also cut a bit of pine garland purchased from the Dollar Tree and tied it into a circle with some jute string (bought at Hobby Lobby). We tied a small black tag (bought at Hobby Lobby) with the white tree drawn on it around the hurricanes with more jute string.
Here is how we made the assorted mini trees:
The
green trees are bay leaf trees and I may have made a few (or 20;) for my
house. The poster board was purchased from the Dollar Store (green
poster board is $0.69 a sheet and I was able to get 2 cones out of each
sheet of poster board). I used
this
tutorial to make the poster board into a cone shape. And then we hot
glued bay leaves onto the trees. If you live anywhere but the southeast
they sell these in bulk at Costco. Word on the street is you can buy
them at Sam's. Or you could raid your neighbor's yard or the local
Farmer's Market like I did:) I purchased bulk bags of bay leaves that
cost $0.74 a bag. One bag made about 2 trees depending on how crushed
the leaves were in the bag. Which makes this little project a whopping
$0.72 a tree!
For the pine cone "trees" we just used a
die cutter to cut out little stars from glitter paper and we hot glued
them to the tips.
For the silver trees we simply covered the tall poster board cones we made in this silver mesh fabric (it's original purpose is garland for a tree - we bought it at Hobby Lobby). We topped then with a mini silver or gold star tree topper we bought from Garden Ridge. We saved the scraps of poster board when we made the cones and used the scraps as a guide to cut the mesh fabric. You can see from the pictures how we rolled the silver mesh out, cut an arc with the poster board cone "scraps", then we used spray adhesive to attach the mesh as we rolled the cone and covered with the mesh. This was a way less messy project than covering the cones with glitter (circa 2011 holiday lunch;). But this metallic mesh really catches light and SHINES!
The top of the lunch lines we just covered with "snow" fabric and some gold and silver star boxes (from the Dollar Tree), wrapped presents and more bay leaf trees.
These door hangers were made by spray painting cake boards from Hobby Lobby with chalk board paint, drawing the tree with a white chalkboard marker and gluing burlap ribbon on the back to hang it.
 |
| We painted these cake boards with chalkboard paint to make door hangers:) |
This was "Santa's Workshop" we made from pallets (see the end of this blog post). We added lights and made doors and windows out of poster board and wrapping paper. We also cut pallets into trees (aka triangles) and strung gold and silver stars (die cut from wrapping paper) across with jute string. This made another great photo opportunity so that parents didn't form long lines in front of the main tree and the stage. It kept the room flowing and no bottle necks around the decor in the room.
Our tree was decorated with gold ad silver stars bought at Walmart and the Dollar Tree. Some of the stars had names of soldiers currently deployed this holiday season. The families enjoyed looking for their soldier's stars on the tree. We wanted them to know they are not forgotten! The tree skirt was a round table cloth bought on sale and with a Cartwheel coupon from Target.
Each soldier submitted to us was listed on the paper and a star placed on the map in their honor.
The "North Pole" pallet house & wooden trees were made with pallets. I simply asked the PTA and school to save me any pallets that they received...so these were all free! If your PTA has any sort of fundraiser they usually receive the items/catalogs, etc on pallets and then have to throw them away. Do them a favor (and your budget a favor) and store those suckers until December. The house was made by cutting a pallet into a triangle and nailing it to the top of another pallet, We repeated that process so we had a front and back with a pitch for a roof. Then we just put hinges on the two front and back pallets with 2 other pallets to make the 4 "walls" of the house. The the roof was two pallets with hinges that we laid on the top of the house. Done! I think we spent $8 on hinges and nails.
My husband has decided our next house will be made with pallets because
these things were somewhat difficult to cut apart. He thinks this house
may sustain hurricane winds!
Next we cut "trees" aka triangles out of pallets. My hubby just used a saw to cut the sides off.
 |
| Here is one cut from the pallet. |
 |
| Cutting the pallet |
 |
| Here he is using a jigsaw to cut the pallets. |
 |
| These were the scraps. We ended up using these as well. Some of them we nailed together to make a wider more stable tree and some we just left the way they were:). |
 |
| The individual boards were a little wobbly without the pallet sides. So
he then reinforced the boards by using a nail gun to punch nails into
the (horizontal) boards along the center vertical board. Later we would string gold and silver stars (we die cut from wrapping paper) with jute string across the "trees". |


No comments:
Post a Comment