

I hope you all have a peaceful week and fabulous parties!! We CAN do this!!
Monday, December 12, 2011
Last Minute Class Party Ideas
Alright people we are running the gauntlet this week! You know what I mean, it's the last days of shopping while your kids are in school, you are trying to finish decorating, you have baking, church, charity work you signed up to, that random get together you planned that sounded so great 2 months ago and now you wonder WHAT you were thinking and CLASS PARTIES!! It's OK. It's going to be alright. We ARE going to make it through this week!! If you need some last minute CHEAP but cute party activities/ideas because you have ran out of time, out of money or Pinterest made you do it and it's not going as planned - I have listed some below.
Also, if you haven't tried www.signupgenius.com I HIGHLY recommend it. You simply create an event, type in EXACTLY what you need and then the site e-mails parents the link where they can sign up and also sends out reminders for you. This site is also great if you are purchasing gifts for needy families (it allows everyone to sign up for the exact items you listed for each child/person). I haven't had any complaints and I have had a lot of feedback that they are getting more parent participation using this site.
I hope you all have a peaceful week and fabulous parties!! We CAN do this!!
I hope you all have a peaceful week and fabulous parties!! We CAN do this!!


Thursday, December 1, 2011
12 Days 2011
It's here!! I almost forgot today was the day to start, but I remembered as soon as my alarm went off this morning!! Thanks goodness I shop all fall for this:) If you are new to my blog or don't know what the 12 Days is then you can click here to read about it. You can also click on the 12 Days link on the right side of my blog to see last year's 12 Days items. Basically I send one small gift in every day for the 12 school days leading up to the Holiday break. The kids are insane and the teachers REALLY do look forward to a treat each day. People have taken this concept and made many versions. I have one friend, Michele, who has a whole peppermint theme for her 12 days. My friend Troye over at For the Joy of Food always sends amazing snacks each day. And another friend is sending 12 Hershey kisses for Day 12 and 11 gumdrops for Day 11, etc. I shop for deals on my favorite gifts to give and that's what I send each day.
DAY TWELVE - A gift card/money tree that the entire class contributed to. I decided this year to do something different than the usual burlap tree. The teachers have to carry so much home and so I wanted something that would be easy for me and them to transport. I bought this cardboard tree centerpiece from Walmart for $2 and attached the money/gift cards. It stands up on it's own or can collapse and go in a gallon ziploc bag.Below you see the front and back.


DAY ELEVEN - A holiday utility tote I bought on clearance for a STEAL from my SIL here.

DAY TEN - An insulated straw tumbler from Walmart. I love this because you can remove the red strip with the snowflake after the holidays:)

DAY NINE - Because we embroider everything in the south...including toilet paper...and it's pretty thanks to my friend over at For the Joy of Food!

DAY EIGHT - A 31Gifts Insulated Lunch Tote - I bought this at a clearance sale from here. They have great sales!!
 DAY SEVEN - "All Things Kitchen" - I bought the dish towels from the $2.50 section at Target, the red "scrapper" and the mini whisk from World Plus.


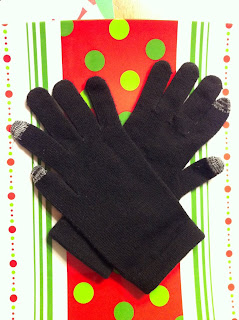
Day FIVE - I forgot to take a picture so these are my gloves...but I gave them Performance Fleece gloves from Old Navy for the playground:)
DAY FOUR - Slipper Socks from Target's Dollar section and their favorite candy

DAY THREE - A Kirkland's Present Knock Knack.

DAY TWO IS THROUGH!
Day Two is a decorative glass spray bottle. I love mine. I keep counter cleaner (like 409, Fantastic, etc.) in it and I keep it out on the counter by the paper towels. It looks like it belongs there. It keeps the cleaner handy without making the counter cluttered. I bought a bunch of these on clearance this summer. The large ones like this were $2.99 and the small ones were $1.49.

DAY ONE IS DONE!
Today was super cold, so I sent a monogrammed insulated mug I purchased from Kirkland's for $2.99.

DAY TWELVE - A gift card/money tree that the entire class contributed to. I decided this year to do something different than the usual burlap tree. The teachers have to carry so much home and so I wanted something that would be easy for me and them to transport. I bought this cardboard tree centerpiece from Walmart for $2 and attached the money/gift cards. It stands up on it's own or can collapse and go in a gallon ziploc bag.Below you see the front and back.


DAY ELEVEN - A holiday utility tote I bought on clearance for a STEAL from my SIL here.
DAY TEN - An insulated straw tumbler from Walmart. I love this because you can remove the red strip with the snowflake after the holidays:)
DAY NINE - Because we embroider everything in the south...including toilet paper...and it's pretty thanks to my friend over at For the Joy of Food!
DAY EIGHT - A 31Gifts Insulated Lunch Tote - I bought this at a clearance sale from here. They have great sales!!


DAY SIX - "All Things Peppermint" - A notepad from Target's Dollar section, tissues from Hobby Lobby (50% off) and Hand Sanitizer from Bath & Body Works.

Day FIVE - I forgot to take a picture so these are my gloves...but I gave them Performance Fleece gloves from Old Navy for the playground:)

DAY FOUR - Slipper Socks from Target's Dollar section and their favorite candy

DAY THREE - A Kirkland's Present Knock Knack.

DAY TWO IS THROUGH!
Day Two is a decorative glass spray bottle. I love mine. I keep counter cleaner (like 409, Fantastic, etc.) in it and I keep it out on the counter by the paper towels. It looks like it belongs there. It keeps the cleaner handy without making the counter cluttered. I bought a bunch of these on clearance this summer. The large ones like this were $2.99 and the small ones were $1.49.
DAY ONE IS DONE!
Today was super cold, so I sent a monogrammed insulated mug I purchased from Kirkland's for $2.99.
Monday, November 28, 2011
School Cafeteria Holiday Decor
I've been a room mom for the past 9 years, I've done several weddings and special events. So when I volunteered to chair our Holiday Lunch this year I thought it would be no big deal. WRONG. Decorating an entire school cafeteria is a much bigger feat than I ever anticipated. The budget I thought was too generous in year's past this year I learned how quickly gets spent. I like to call this little Holiday Lunch endeavor God's way of humbling me in more ways than one. Hard lessons learned so far include the fact that I don't know everything, I open my mouth way more than I should and when I over commit myself I don't just hurt myself but my family suffers too. Needless to say I have never been more happy to be DONE with an event. My feet hurt, I'm sore all over and myself, my house and my deck are permanently glittered!! But I do think my hard work paid off because the school looks great!
In any event, I found that there was VERY little out there on large scale holiday decor for school cafeterias/and schools in general that wasn't really expensive or looked REALLY cheap. So, if you find yourself in over your head here are some helpful hints and examples from our school this year.

Large Scale Props - My aunt does set design for her church every year. She makes the MOST amazing things out of the most ordinary supplies. So I went straight to her when I needed CHEAP large scale props for our stage area that didn't look cheap. We decided to do a "Peace, Love Joy" theme this year and so we cut out the words. She suggested insulation foam. It's about $9 for an 8ft by 4ft sheet at Home Depot. It's very light, we actually cut these letters out using a box cutter and paint adheres to it very well (as opposed to MDF board which is too heavy and soaks paint like there's no tomorrow and no end to your budget;). I love this material for all the reasons I just listed and the fact that these suckers are hung with fishing line we taped with Scotch brand packing tape to the back. That's right these 8ft letters are hung with packing tape and fishing line - very, very cheap! I will caution that we used Krylon Glitter Blast Spray Paint which was expensive and I would NOT recommend. The glitter clogs the spray nozzle and so it is IMPOSSIBLE to spray evenly.

Glitter Cone Trees - I found glitter cone trees at Hobby Lobby and wanted them so badly but they ranged from $4.99-$9.99 and we needed 78 of them. So instead I followed this tutorial I found on pinterest to make the poster board cones and then I used spray adhesive and glitter to make them glitter cone trees. I actually cut the tops off of the 12 pack long cardboard soda boxes, lined them with parchment paper (because NOTHING sticks to parchment) placed the glitter in the box and then I sprayed each cone tree with Scotch brand spray adhesive, waited 10 seconds for it to become tacky and then rolled the cones in the glitter. The spray adhesive and glitter was an extremely messy project. BUT, they are really pretty and they cost about $1 to make so it was worth the work...almost. We then hot glued these glitter cone trees to metal trays I purchased from the dollar store. This will hopefully keep the kids from knocking them over....hopefully.

Table Runners - The quickest and cheapest way to make an impact in a large room is color on the tables. I needed to make something cheap, colorful and practical. SO I decided to purchase plastic tablecloths and make them table runners. I cut 108 inch long plastic table clothes into 108 inch strips. I actually just cut along the vertical fold lines when I unfolded it out of the package. To fit our tables I had to sew 5 strips together to make one long 545 inch strip and then I ran the strip through my sewing machine folding or pleating it every 5-6inches to make a "ruffled" effect. The finished product was cheap (about $2 each), colorful and very practical because we can wipe them off each day.

Donations - The 12 foot tree you see in this picture was FREE. That's right, FREE. When I decided to chair this committee I sent e-mails to anyone I knew, including my neighborhood asking anyone who was getting rid of holiday decor (outside or inside) to please let me know. Our school scored 2 huge inflatable snowmen for the Holiday Shop and we scored this huge tree for our cafeteria. We actually are going to send an e-mail out this entire month asking people to please donate their "retired" holiday decor to our school. I then picked up some cheap ornaments from Walmart, some mesh and ribbon from Hobby Lobby and I made the tree skirt out of round plastic table clothes that match the table runners.
I hope that you all have a very Happy Holiday season and a very Merry Christmas. Happy Decorating!!
Friday, November 18, 2011
Thanksgiving 2011
Happy Thanksgiving Break everyone! I'm sorry this post is a little late - but maybe it will be helpful for at home projects next week or next year. I apologize for not posting that often this fall. I volunteered to chair the Holiday Decor committee for the cafeteria of our school and I have 78 cone trees that I've made and now must glitter - so my hands are quite full. I have found that there is not much out there on how to decorate cafeteria's and so I'm planning to write up a post with pictures if you need any ideas. But I digress...
If you have not joined Pinterest...WHAT are you waiting for. This is such a fabulous site with so many wonderful ideas!! I pulled all three of my class Thanksgiving projects from Pinterest and just to show you these projects can be done I have posted pictures of my class completed projects. If you would like directions and a much prettier picture I suggest clicking on the Original Project Site for each of these projects. I am SO thankful for Pinterest...it is definitely a room mom's best friend!
Oreo Turkeys (sideways:)- Click HERE for where I got instructions from the original project site.

Thankful Turkey Bags - Click HERE for where I got instructions from the original project site.

Nutter Butter Turkeys (sideways:)- Click HERE for where I got instructions from the original project site.

Wednesday, October 26, 2011
Halloween 2011
Halloween is upon us! I am working on my spooky house cookie supplies that I'll be bringing to school on Friday to complete the activity in class. I'll post pictures afterwards of course:) I happened upon this poem that I modified for public school. As always, I am sending in the FREE Wendy's Frosty coupons. I do this because they are super cheap (10 cents a piece), they are for a good cause (adoption charity) and they don't give the kids a sugar high in class (so the teachers still love me:). I purchased this super cute paper at Hobby Lobby on sale for $1.80 for 25 sheets. So, this gift cost me $4.30 total to give one to each child in a class of 25 students. Hope your Halloween festivities are going well!


Sunday, September 18, 2011
Coffee Mug Chocolate Cake
I have a million things to do and I don't want to be doing anything but sit on the couch, watch TV and eat something naughty. I need to go to the grocery store, I don't feel like exerting a whole lot of energy and destroying my kitchen to wait 30 minutes for a homemade dessert. I've felt this way all weekend. So what have I actually done this weekend? I have perfected my own Mug Cake recipe. Will this end world peace? No. Will this further any of the projects I've currently got going on or committees I'm serving on? No. Does my attitude or actions reflect any of the lessons taught in church today? Sadly no, however I did include my kids on the final recipe and now they think I'm the "most incredible mom ever". Does this have anything to do with being a room mom? Absolutely not. However I felt the need to share so enjoy:)
Room Mom's Coffee Mug Chocolate Cake Recipe:
3 Tablespoons Unsweetened Cocoa Powder
4 Tablespoons Granulated Sugar
1 Tablespoon All Purpose Flour
Pinch of Salt
3 Tablespoons Vegetable Oil
3 Tablespoons Milk
1 Egg White
1/2 tsp Vanilla Extract
3ish Tablespoons Chocolate Chips
In a microwave safe coffee mug (mine holds 2 cups so I would say use at least a 1 and 1/2 cup or higher capacity mug) place the cocoa powder, salt, sugar and flour. Stir around with a fork until combined. Add the oil, milk, egg white and vanilla. Stir/whisk with a fork for a minute or two until the mixture is combined, thick and smooth (except for air bubbles).

Dump some chocolate chips in and stir again. Cook in microwave for 1 minute 45 seconds. And use a pot holder to remove if your mug gets really hot. Microwaves vary but you do NOT want to over cook the cake (otherwise it's rubbery). The cake should have a flourless cake consistency. It should be moist but not runny (except for the melted chocolate chips). If after 1 minute 45 seconds the cake is runny then you should microwave for 10 more seconds and continue to do so until the cake is no longer runny.

When I remove the cake I add some more chocolate chips and stir around to make it extra naughty.


And like Dolly Parton would say "I like to cut the richness of the cake with some ice cream" or I might suggest whipped cream. But alas, I still have not gone to the store so I have non of these. I do however have one kick butt coffee mug cake that is easily hand held while I sit curled up on the couch watching When Harry Met Sally. Will you have what I'm having;)

Subscribe to:
Posts (Atom)


