
Showing posts with label Valentine's Day. Show all posts
Showing posts with label Valentine's Day. Show all posts
Thursday, February 14, 2013
Valentine Carrots
This year my teacher asked me to make a heart shaped lunch for my son's pre-school class. We cut sandwiches into hearts with a cookie cutter, we cut slices of cheese from a cheese block into a heart shapes, we cut strawberries in half to look like a heart and then I made these heart carrot slices. You take a carrot stick and using the potato peeler you shave or "whittle" one side of the length of the carrot into a point. Then you cut a "v" out of the round top length of the carrot. I used the potato peeler to "round out" out the "v" edges. Then you slice the carrot horizontally into hearts. Viola!


Wednesday, February 9, 2011
O"FISH"AL Valentines
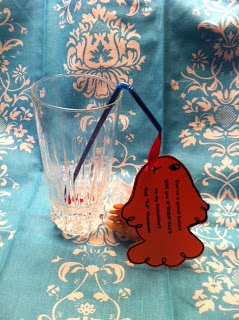
I had to make my son valentines for his class. I've never made valentines for a boy before so I wanted to make something "boyish" and toddler appropriate. So, I thought up these cute little valentines. This idea stemmed from the testing snacks I did for ITBS and the eighteen25 blog. You could use goldfish crackers OR Swedish fish candy.

Supplies:
Straws
Card Stock
Ribbon
Goldfish Crackers or Swedish Fish Candy (you may be able to find them already individually packaged)
Small Clear bags (I used lollipop bags)
Stapler
Hole Punch
Directions:


Supplies:
Straws
Card Stock
Ribbon
Goldfish Crackers or Swedish Fish Candy (you may be able to find them already individually packaged)
Small Clear bags (I used lollipop bags)
Stapler
Hole Punch
Directions:
- Print the wording onto colored card stock making sure to space out the words so you can draw a fish around them. Mine read: You're a Catch! Will you O"FISH"ALLY be my Valentine?
- Draw or trace (from a template) a fish around the words. Cut the fish out, add a face if you like and punch a hole in the mouth.
- If you bought prepackaged crackers or candy great, then just punch a hole into the bag! If not, put some candy or crackers into the small clear bags, fold and staple to secure shut - then punch a hole in the bag.
- String the ribbon into a straw. Tie a knot at the bottom of the straw to secure the ribbon.
- Bend the top of the straw, string the ribbon at the top through a cardstock fish and then through a bag of crackers or candy and tie the ribbon to secure the cardstock fish and candy/crackers at the end.
- Enjoy!
Sunday, January 30, 2011
Valentine's Day Class Party Ideas
One of the things I think that I do best is recognize when someone else does it better;) Case in point...get on over to One Charming Party and check out their Class Valentine's Day Party posts. I'm NOT kidding, get over there. WHY are you still reading this?!! Get to clicking people!! They have 3 blog posts already!!
Sunday, February 14, 2010
Valentine's Day 2010
Valentine Boxes
This year my oldest daughter's teacher had the children send in a cereal box to make their valentine boxes at school. I wasn't quite sure exactly what was going to come home...but I LOVED what did!!She basically cut the top of the cereal box off at an angle so the back was taller than the front and she had the kids paint the box red.
 Then she had the children make a face out of construction paper and crayons and then glue it to the back of inside of the box so it faced out (no pun intended:). See how many Valentines the box holds!!
 Then she had them cut out hands and hearts out of construction paper and glue them on the front of the box. SO CUTE! Thanks Ms. "D" - you are the BEST!!
 Beside the adorable "cereal box" is my youngest daughter's Valentine box. She was asked to make a unique Valentine Box for her class. I was short on time so this was all I could come up with. We just took a container that my dishwasher tablets came in, covered it with green paper as the "stem" and then cut different sized scalloped circles to make the "petals" of the flower. Then I cut a whole in the top with a knife & scissors - and we have a "flower box"!
Cell Phone Valentine Cards
We decided to make Valentine cards this year. I found this really cute idea in Family Circle or Wondertime - I can't remember which one. To make these you will need: silver or gray card stock, white card stock and candy buttons. I had to go to a local candy store to find all the candy buttons we needed!!You print out the children's names and the message on white card stock and cut them out. You fold the gray card stock and cut out "phones". Then from the scraps of gray card stock you cut out the antenna. And see below on how to assemble...

Here is the front of the card...
 And here is the inside, the cell phone buttons are edible candy buttons!!
Valentine Treats/Snack
I usually send in a small treat for Valentine's Day and I usually send it in some sort of package that the teacher can choose to send home with the students (in case they are too hyper or too busy to eat the treat during the school day). This year I found these boxes on clearance at Target so I made a huge batch of brownies, cut them into heart shapes using a cookie cutter and then put them in the boxes. They LOVED them!!

Wednesday, January 6, 2010
Paper Flowers
 Remember making paper flowers out of Kleenex when you were a kid? I think more than a few trees were sacrificed for my paper flower making. Well, here's an easy, more efficient way to make them. These are super easy to attach to card stock if you like to make your own valentines.
First, the cast of characters... Baking Cups and Assorted Brads ( you can find these at Target, Walmart and craft stores)

To make the carnations you will need 3 baking cups of the same color (I used pink) and a pink brad.

Place the 3 baking cups inside eachother and turn them inside out. Then push brad through to the back.

Secure brad by opening up the flaps.

Flip the "flower" back over to the top side of the brad and begin crumpling each baking cup around the brad.

Continue until each baking cup has been crumpled and ta da - your carnation is complete.

To make the daffodils you'll need two yellow baking cups, one white baking cup and a yellow brad....
 If you would like to secure your flower to a piece of paper then first punch a hole through the paper using the brad and then remove the brad.
Place the two yellow baking cups with their white sides together and then place these inside the white baking cup.

Secure the baking cups together with the paper by punching the brad through the baking cups and the previous hole you punched in the paper.
 Secure the brad, then flip over and crumple the two yellow baking cups around brad and then flatten out the white baking cup. Your daffodil will look like this..
 These are so much fun and you can even use pipe cleaners instead of brads to make little stemmed flowers to make a bouquet. Enjoy!
Subscribe to:
Posts (Atom)


